|
I’ve written at some length about designing notation templates (read some previous blog posts here), but now I want to explore some general guidelines on using your templates for various projects. But wait, you say, I thought the whole idea of creating a template was to use it for every project, in the same way, every time. Or is this some strange grammatical puzzle? I promise you, it’s not a trick of English grammar (there are enough of those already), or that I’ve led you astray on my template recommendations. Let’s dive in.
What really affects the way in which you use a template starts with two factors: 1) Where is the project starting? (There’s a sub-question here about what role you have in the project, but I’ll cover that another time.) 2) What notation program are you using? The first question is concerned with what format the notation starts. I know a lot of composers still begin their works with pencil and staff paper, sketching out ideas and melodies here. If this is where you are starting, whether you are the composer, arranger, orchestrator, or copyist, then the answer to the second question of which notation software you use is a personal preference. Any full-featured notation software will do, and if you have a template all set and ready to go, just start inputting your notes and you’re off and running. If you are starting your sketches in a notation program from the beginning, then the process is the same. Starting the notation process here is an example of working “in” a template, meaning you have created the template to be an environment in which you work, and everything started and finished in this template will now have all the characteristics and functions you want since you began the process in the template. Where things become less straightforward is a situation like this: what if you are given the task of updating an existing notation file? In this case, the notation may come to you in various conditions and needs to be revised and modified. This is primarily where I start on a project; a composer, arranger, orchestrator, etc., has a piece of music that needs to be cleaned up and formatted properly for the specific use. If this is where you are starting, reinputting the entire piece by hand would likely be impractical or impossible given the time or budgetary constraints of the project. This is where the question of whether you rework the piece “into” your template or impose “onto” the piece the settings from your template comes in play. For a Finale user, this is a job for copying the original piece into your template. For shame, you say! Once I copy this other piece into my Finale template, the articulations may not match the settings in the template, and the expressions are all wrong and using the wrong settings! How is working in a template helpful when what you’ve copied into it looks wrong? Relax, breathe… Finale’s expression menu and articulation design menu make it easy (to a degree) to correct this. For example, let’s say you have a lot of different text directions, like pizz. or arco, that are not using the correct font style or placement now that you’ve copied them into the template. All you need to do is go into the expression menu, find all the different texts you copied in, move them to the correct expression category that has the settings you want, and then click the dropdown menu to reset font and position, and then you’re done. Go out of the expression tool, highlight the staves you want, and go to utilities/change/expressions… and hit ok to reset the position of all the expressions. Now, these will use the correct fonts and have the correct spacing as if you had created them in the correct expression category to begin with. You can also do a similar method in the articulation menu. If there is a staccato marking from the old file that isn’t the one you want to use, simply select it, delete it, and then from the pop-up menu, select replace and find the correct one you had in the template already, hit ok, and then all occurrences of that articulation will be the one you originally designed in the template. Go back out of the articulation tool, highlight the staves you want, go to utilities/change/articulations, reset the position, and everything will now appear as you originally intended. If you are a Sibelius user, the concept of copying into a template also works, but the process of resetting different elements changes. Once you’ve copied in the notation, highlight what you want, and go to the appearance tab and select reset design and reset position. These should generally update everything to look and behave like the settings you already have in the template. If you have lots of custom font styles for symbols and other elements, it will be a longer process to get those looking exactly as you intended, but it’s still possible. A new and often better method is to import an old file into your template using the file/import function. From this menu, you can assign the existing staves to the corresponding instruments in your template and keep the settings from your template (make sure to uncheck settings that import the house style from the old file), and away you go. There is still a good bit of updating to do after this, but this is a very useful method. Sibelius also offers a way to impose your template settings onto an existing file by using a house style. First, go to your template file, export the house style, and then import it into the file you are updating. Once you do this, follow that reset procedure from above. A house style will take settings and presets from your template file and superimpose them onto another file, making the settings in this old file the same (largely) as your template. In my experience, this isn’t a foolproof method, but it does work and can be a great way to import all the various settings from a template to a new file without having to go line by line and find them all and change them. Where Finale uses a “copy into a template” workflow, and Sibelius can use either a “copy into a template” or “impose settings from a template onto a new file” option, Dorico squarely falls in the onto camp. The limitations and imperfections of the import house style function in Sibelius are completely absent from Dorico. Dorico’s library manager feature is incredibly powerful and user-friendly. First, open your template and navigate to Library> Export Library. Save the file. Now go to the piece you’re updating and go to library/library manager. From her,e either select that library file or drag the icon of your Dorico template file into this menu. Dorico will now have a long list of all the various settings in the correct file that don’t match the library from your template. Simply click to change all the settings you want (or click the major categories of notation options, engraving options, layout options, etc.) and Dorico will take care of the rest. It’s very effective, and I’ve found it to be seamless in almost all instances I’ve used it. Next, you can also import page template sets in engrave mode (again, export these from your template), and you can use them in this file. Now, all the engraving, notation, and layout settings and your page templates are the same in the old file as your template file. Ok, I know that was a lot to digest, but as you can see, depending on which notation software you are using and where the project begins can change how you use your template. Remember, your templates aren’t just a file; they should contain concepts, workflows, and ideas that can be used on any file. This makes your template more useful and flexible, saving you time and headaches. Got questions, contact me and I’d be happy to help. It’s a New Year and many of us are learning new things, like exercise routines, cooking techniques, or obscure hobbies like extreme ironing (yes, it does exist and thanks to the internet, we now all know about it). Even in our little corner of the music industry, music engravers are trying out new techniques, technologies and practices. This year, I’m certain there are more people doing this than usual, given the announcement last year of the sunsetting of Finale.
(read more on my take on that here and what you should do). A question I’ve been receiving a lot from friends and clients alike is how do I go about learning one of these programs? Should I just dive right in on a project already in progress, or watch endless tutorial videos or even just experiment in the program till I learn something? All these approaches may yield some results, helpful or otherwise. However, having learned 3 notations programs (Finale, Sibelius and Dorico), I’d like to offer a roadmap of sorts to navigate your way through the beginning frustrations to the calm peaceful pastures of total mastery (well, ok, at least to having a vague idea of what’s going on in the program). First, and this is a more philosophical mindsight, you need to treat these programs like musical instruments. This sounds a bit strange or over the top but let me explain. Much like practicing and playing an instrument, there various ways to approach any given technique or skill that you want to master. Yes, there are basic skills that are used repetitively, but the application of these skills in each given playing situation may be slightly different. Learning and practicing scales is a great example of this; you can play a scale in many different fingerings, tempos, rhythms, or styles based on the music you are playing, but you are still just playing a scale. A notation program, especially ones as powerful as Finale, Sibelius and Dorico (and Musescore to an extent) have various ways that you can achieve the same look on the page, but use different tools, techniques or processes to make it happen. This ability to use the program in various ways is/was especially pronounced in Finale, where there could be 4 or 5 ways to achieve the same result and choosing which one of the methods to use took experience and practice to learn. This flexibility and vast quantity of possible uses is great for someone like me, a professional engraver and, understandably, frustrating for a novice or those just learning the program. Sibelius and Dorico both have elements of this, Dorico perhaps a shade more than Sibelius, but again, all have the flexibility to be used, modified and adapted to all sorts of uses. Another way in which learning these programs should be approached like instruments is that it will take time to learn them. If you imagine that you will be completely proficient at an instrument in a matter of a few lessons and rehearsals, that would be absurd. Of course you wouldn’t be! As I’ve mentioned in the last paragraph, how could you possibly have the experience on an instrument/program to choose between various methods to achieve a goal with such limited experience? You can’t and to expect to be is folly. Take your time, try doing the same thing in different ways, ask others with grater mastery; these are all practices we would expect to employ when learning a music instrument, and therefore we should use them when learning a notation program. There is so much to learn and try so take your time. Ok, now some practical steps. Here’s the method I have employed to learn and grow in mastery of each of these programs. 1) Read at least some of the manuals. Yes, I know, they are tedious and boring, but there are tons of information in there and if you can gleam enough about the underlying philosophy of how the program was built, it will save you hours of frustration trying to get the program to think like you do. Especially in the beginning, you need to learn how the program thinks and then use that method. Once you have learned enough about the program, then you can slowly adapt it to your preferred workflow. 2) Almost of all the manuals have practice projects that introduce escalating concepts and tools. Use these! I know, it can seem crazy if you already know another program to start at the very beginning with simple tasks, but you must learn how the program works, not how you THINK IT SHOULD WORK. Again, you can’t change or modify something, especially for the better, until you know how it works and then you can find places to improve it and your use of whatever tools it offers. 3) Engrave simple pieces. Start at Mary Had a Little Lamb; yes, I’m serious. Start there, remember what tools to use when, and what order to use them. Then add new elements to simple pieces, like chord symbols, more dynamics or articulations, change key, and new instruments, etc. Start small; don’t let your first project be a 10min full orchestra piece. 4) Progress to engraving more complex pieces, especially for instruments you do not play or are not as familiar with. My go-to repertoire for pieces like this is classical guitar music. There are so many layers, techniques, and elements in that notation that you will certainty get a great notation-focused workout just trying to recreate a one-page piece. Try choral music if you are mostly an instrumentalist. Try engraving a harp part (always tricky). There are so many elements and standards in various kinds of instrumental notation that you can explore and learn from and that makes learning all the corners of a notation program much more enjoyable and practical. 5) Try taking an old project you completed and like the look of and recreate it in the new program. This step helps to train you brain to adjust a previous workflow to the new environment while having something you are familiar with. Engraving new pieces from scratch is great, but reworking an old project that you are familiar with helps you to see how comfortable you are using the new program and what areas between the programs are different for better or worse. 6) Lastly, take another project where you were asked to update an old file or someone else’s file and go through all the same processes in the new program. This simulates more how I would typically work on a project (as a copyist, not a composer/arranger) so this may not be as useful to all of you. However, the benefit is that you learn to take someone else’s work and then have the goal of turning it into something else, which can help you explore different areas of the program and then learn best practices to undo and redo problematic uses of the notation software. As you get into the weeds on a new program, whether transitioning from Finale to Dorico or Sibelius (I’ll have more thoughts on that for you in another post later) or trying to learn new things about the program you already use, (don’t abandon Finale yet) try out some of methods. I confident they will help. And remember, take your time, mastery (whatever your definition of that is) takes time, and the underlying logic of one program or another may feel more natural to you and that’s ok too. As always, contact me if you have questions, need some more advice or a helping hand on a project. “Behind the Score” For the 3rd installment of my series on template design, let’s look at some more “behind the scenes” functions that can give your template new functions and possibilities. If you haven’t read the previous two posts on this topic, I highly recommend you start by reading those first, as they cover more general topics and philosophies behind the design and ultimate implementation of your template. Blog #1 – Template Design Blog #2 – Use the Right Tool for the Job I often encounter files where whoever created and uses the template spent a great deal of time making sure that everything looks great on the main score. All the elements are perfectly placed, font choices are consistent and clear and a whole host of other features are in evidence. So, the job is done, correct? Well…. Not quite. Having an amazing looking score is great foundation, but if the further functionality of the file in terms of how the parts are formatted is ignored or overlooked, then the job is only half finished. As we discussed before, when you place an expression on the score in Finale or Sibelius, you need to use the right tool for the job. You can have an element on a score like a tempo marking that looks perfect on the score, but if that marking was placed using the wrong tool or category, then it ultimately will not function properly for the parts. Just think, on a large orchestral score, there could be 30 individual parts that will need to be accounted for and if an element that is supposed to show on all 30 of those parts does not, that is going to cause you a lot of headaches and unnecessary work. Even on a smaller score, having to reinput different elements for only a few parts is tedious in the extreme. The next consideration is how many parts there will be. Sounds easy, right? It’s the same number of parts are there are staves in the score. Or is it? Look at the screenshot from a large orchestral score. 
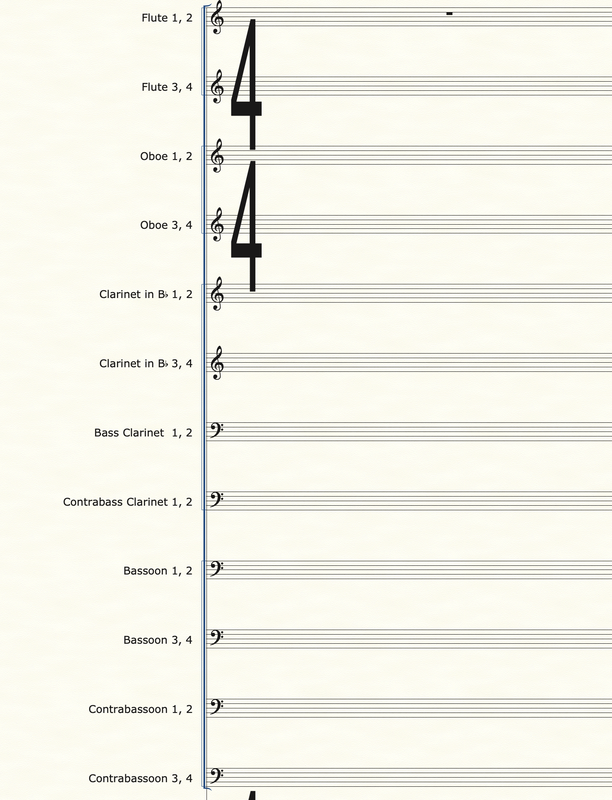
This woodwind section is (admittedly) very large. There are 12 staves just for winds. But how many parts are there? Actually, there are 24 parts to format. The reason for that is players do not want to have to read multiple lines of notation to find their part. It is common and accepted practice for scores to combine multiple instruments onto a single line, but parts (if possible or unless otherwise specified) should not have multiple voices on them. So, how can we design a system where a single staff can be made into multiple parts AND do so without changing the original staff? While this may sound tricky or impossible, there are a few good methods to achieve in either Sibelius or Finale. And there is one method you should ABSOLUTELY NOT use, and I’ll explain that too. My preferred method is to use additional hidden staves. Check out this screen or the same score, but this time with the hidden staves revealed. 
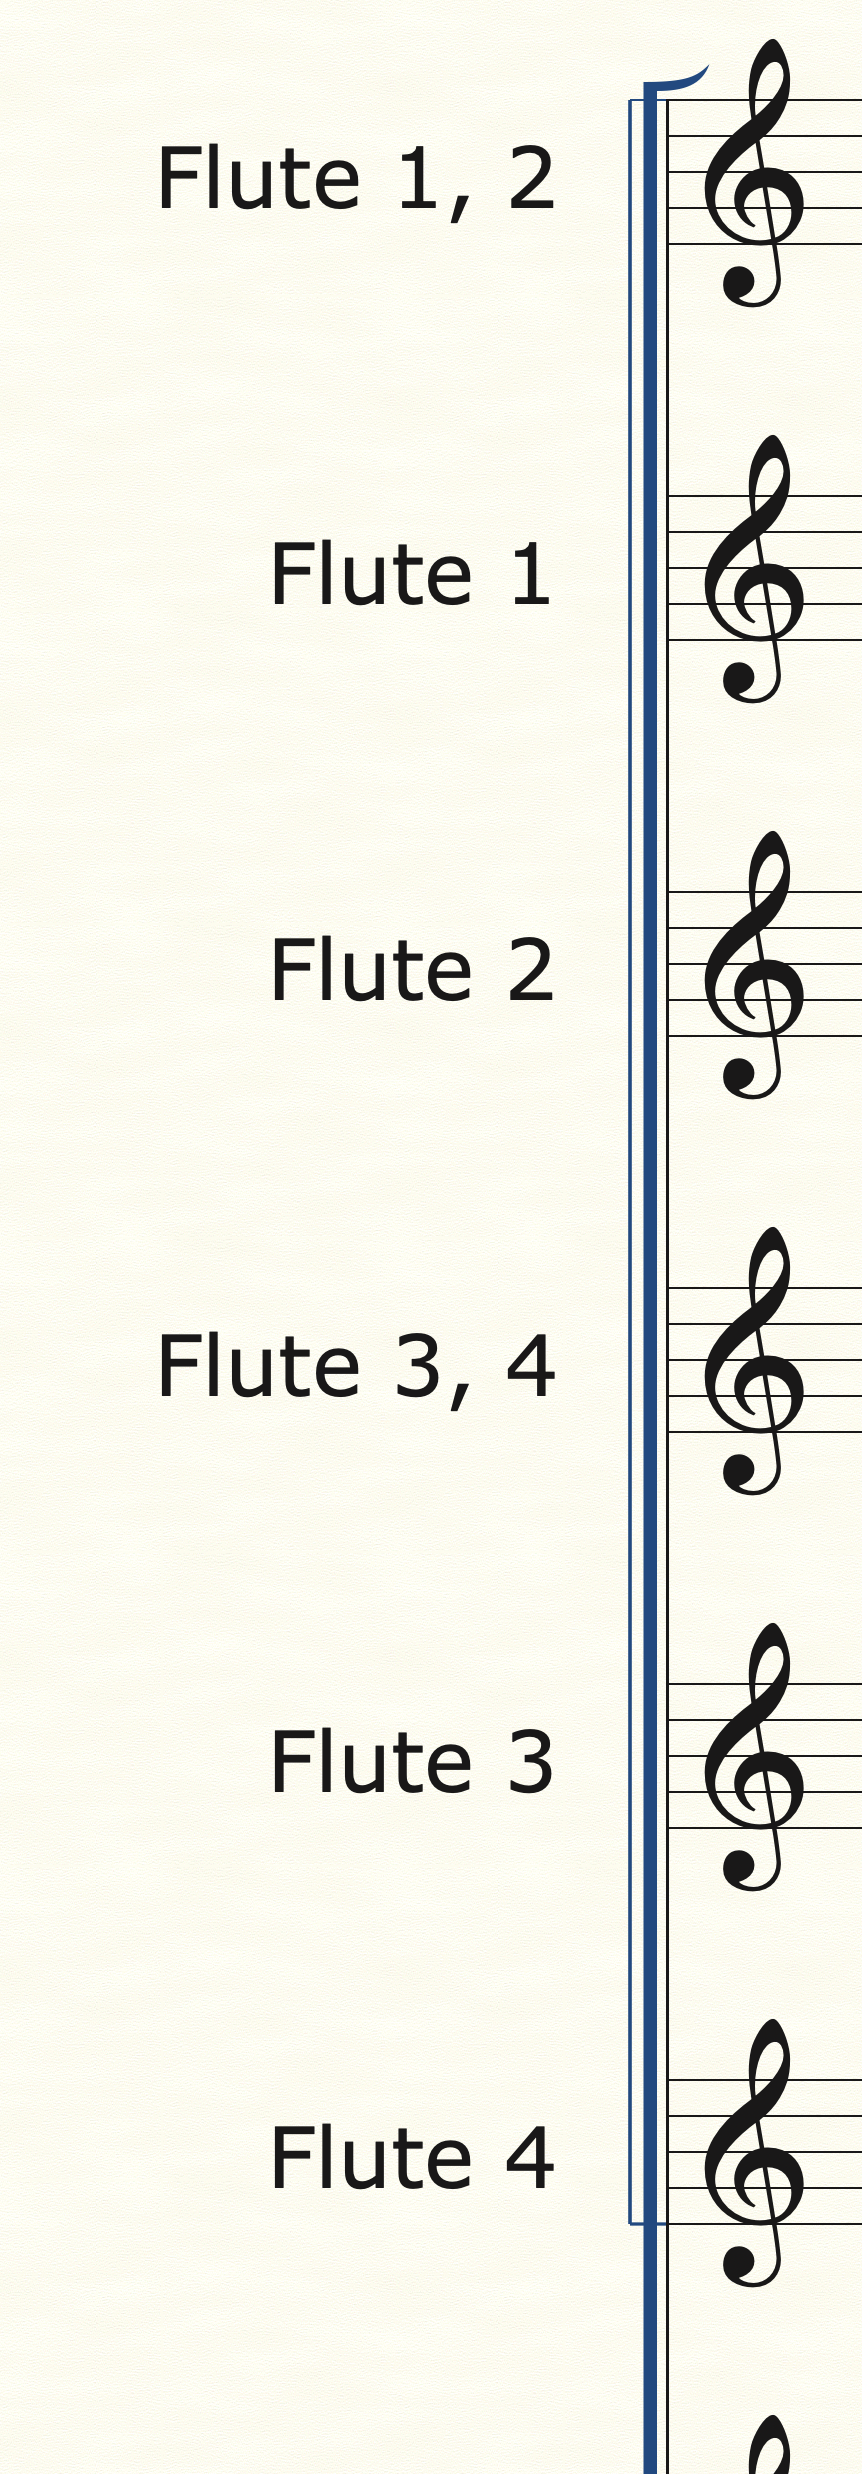
As you can see, right below the Flute 1, 2 staff are two separate Flute 1 and Flute 2 staves. These staves are hidden in the main score and only used for parts. You can hide staves in Finale by using the Staff tool, double clicking the staff you want to hide and selecting “Force Hide staff” and select “In Score view”. Now, you can add additional staves to your template without changing the formatting or orchestration of your score. In Sibelius, you can achieve a similar function by us the “Focus on Staves” feature in the layout tab. That dropdown menu will show you all the different staves in a file and you can choose which ones to have visible on the score.
Once these additional staves are in place, you can copy the original part into both of those and separate out the notes for each part. There are multiple methods for this and which one to use greatly depends on several factors, including the complexity of the music, how you want to handle cues in the different voices, etc. For Sibelius, you can highlight the source staff, go to Note Input/Explode, and then select the staves you want the music to go into. Bam! Done! In Finale, you can use Utilities/Explode, but I prefer to use JW Staff Polyphony to help split the voices or to copy the source music into the new staves, and then use TG Tools/Process Extracted Parts and select the appropriate voice for the staff I’m working on. The benefits from using this hidden staves method will pay dividends repeatedly down the road for you. Now, you have the original source music intact and can refer to it while making any number of changes to the individual parts. Later, once you have formatted your part for the top line notes, in this case Flute 1, often you can use the copy part layout function in both programs as the 2nd voice, Flute 2, will need the same formatting as the 1st voice. That means you only must format one part and then you can reuse that formatting again without having to go through all steps twice, a huge time-saver. One method that you SHOULD NOT USE is to extract the original part into a separate file and then format. This method was the only one available before Sibelius (with dynamic parts) and Finale (with Linked Parts) added this functionality well over ten years ago. Using this method will create dozens of extra steps and redundancies that waste time and are terribly inefficient. There are a few very special circumstances where it may be necessary to extract a part as an entirely separate file, but those are very few and rare. If you are using a part extraction method, I urge you in the strongest terms to not use this method any longer. You are wasting your time, creating additional opportunities for errors to creep into your music and missing out on tons of benefits from having your parts linked to the original score. Just like building a house, a good template is built on a strong foundation and a lot of the most important features are where you can’t see them. The more time and consideration you give to every step in the process from initial note input to final editing will yield benefits that multiply over the time you are working on the specific piece of music and over the months and years you use your template. As always, if you have questions, need advice, want to schedule a time for a custom template consultation or need a template designed for you next project, please contact us here are Engraver’s Mark Music. We have the tools and experience to help with any project, big or small. A common question I get asked from composers to music students exploring the various options for music notation software is, “Which one is the best?” Well…. I would guess all of us have certain opinions in the music engraving world, but I think the better question may be, “Which one is best for me?” To explore this a bit more, let’s take a look at the current state of music notation software and how we got there. The art of music engraving has undergone vast changes in the last 30 years. Like most of society, the digital revolution and the age of the personal computer completely upended how we work and what functions and capacities are available to the average person. What once took a team of people all day to do might only take one person a few minutes now. Music engraving got into the digital age with programs like Finale and Sibelius, both of which started to appear in the late 1980s. Since then, there have been several other digital music notation options like Musescore, Lilypond and most recently (and successfully) Dorico, along with various apps for the iPad (like NoteFlight and StaffPad and others) have come on the scene. Finale and Sibelius have, and mostly still do, dominate the music engraving and educational markets while other options have largely remained as niche options of individual composers. However, these other options are now making great strides in their capabilities and ease of use, making them viable options not only for independent composers and arrangers, but even for major scoring sessions. When I get asked the question of “Which notation software should I use?”, my first response is always a question of my own, “Well, what will you be using it for?”. This question is, to me, the REAL question to ask yourself if you are looking into the various notation software options. Knowing where you dream of your music going or what part of the music industry you want to get into may affect your choice. For example, if you are an independent composer/arranger or even a music teacher, writing simple pieces for a few instruments or musical exercises for your students, then just about any option will work fine. I would suggest using any of the iPad apps as the learning curve for those is likely to be manageable and you won’t have too many options or menus to get lost in. Also, Finale, Sibelius and Dorico all have a free version of their notation software which may have all the various options and functions you could need. There’s no real need for a major investment in time and money if your notation needs are very “local”, meaning the music will be produced and distributed largely by you and just for you or a few others or simplistic, meaning you are not writing avant-garde new age music for specialized instruments. Where things get a bit more complicated is when your aim is for a larger market OR a larger project. The free versions of these different softwares will be limited in the number of staves or other functions they have and if you have a larger work, they simply won’t be able to handle that. Also, if you plan on working with a publishing company or even just other arrangers or composers on a given project, it’s best to choose a software that will grow with you and be able to be used by others seamlessly as well. This is where the full versions of Finale, Sibelius and Dorico, I feel, are the most appropriate. There’s no point using a software that won’t have the capabilities you’ll need down the road. So now you may ask, “Ok, I need a full featured music notation software. Which one should I choose?” For years, the “big 2” options were Finale and Sibelius. In professional and educational circles, one or the other has been used for decades. Using either one of these options will give you all the functionality and capacities you could ever need (and many that you’ll probably never use). I would also add Dorico to this list. Being, relatively, the newest kid on the block in the music notation world, Dorico has had some growing pains and, quite frankly, it really wasn’t ready for the big time when it first came out over five years ago. Now, I truly believe Dorico is not only a viable option, but one that offers some of the most forwarding thinking functionality and ease of use features. I still don’t see Dorico being used in my end of the music engraving world as much as Finale or Sibelius, but it is certainly gaining ground on both. Professionally, I have used Finale and Sibelius for over 16 years and am looking to add Dorico into the available options here are Engraver’s Mark Music in the coming months. My final piece of advice is, choose an option that fits your needs now but can grow with you in the future. If I was starting from scratch today, I would try to learn with each of the free versions of Finale, Sibelius or Dorico and then see which one felt most natural and go with that. If you’re an independent composer or arranger, there are so many options out there now, and even better, there are so many good options that weren’t available before. Personally, I used Finale before I learned Sibelius and I still tend to gravitate that way at times. However, there are long stretches of projects where I am primarily using Sibelius, by my choice or because the client works in that program, and I come to find I enjoy using it as much if not more than Finale. Again, all these different music notation programs have their advantages and disadvantages; things that drive us nuts and features that are lifesavers. The best option for you is the one that makes creating your music as seamlessly as possible. If you have any questions or thoughts on this, please contact Engraver’s Mark Music and let’s see how we can guide you and help get your music out to the world! |
AuthorSammy Sanfilippo, CEO of Engraver's Mark Music Archives
January 2026
Categories
All
|