 “Behind the Score” For the 3rd installment of my series on template design, let’s look at some more “behind the scenes” functions that can give your template new functions and possibilities. If you haven’t read the previous two posts on this topic, I highly recommend you start by reading those first, as they cover more general topics and philosophies behind the design and ultimate implementation of your template. Blog #1 – Template Design Blog #2 – Use the Right Tool for the Job I often encounter files where whoever created and uses the template spent a great deal of time making sure that everything looks great on the main score. All the elements are perfectly placed, font choices are consistent and clear and a whole host of other features are in evidence. So, the job is done, correct? Well…. Not quite. Having an amazing looking score is great foundation, but if the further functionality of the file in terms of how the parts are formatted is ignored or overlooked, then the job is only half finished. As we discussed before, when you place an expression on the score in Finale or Sibelius, you need to use the right tool for the job. You can have an element on a score like a tempo marking that looks perfect on the score, but if that marking was placed using the wrong tool or category, then it ultimately will not function properly for the parts. Just think, on a large orchestral score, there could be 30 individual parts that will need to be accounted for and if an element that is supposed to show on all 30 of those parts does not, that is going to cause you a lot of headaches and unnecessary work. Even on a smaller score, having to reinput different elements for only a few parts is tedious in the extreme. The next consideration is how many parts there will be. Sounds easy, right? It’s the same number of parts are there are staves in the score. Or is it? Look at the screenshot from a large orchestral score. 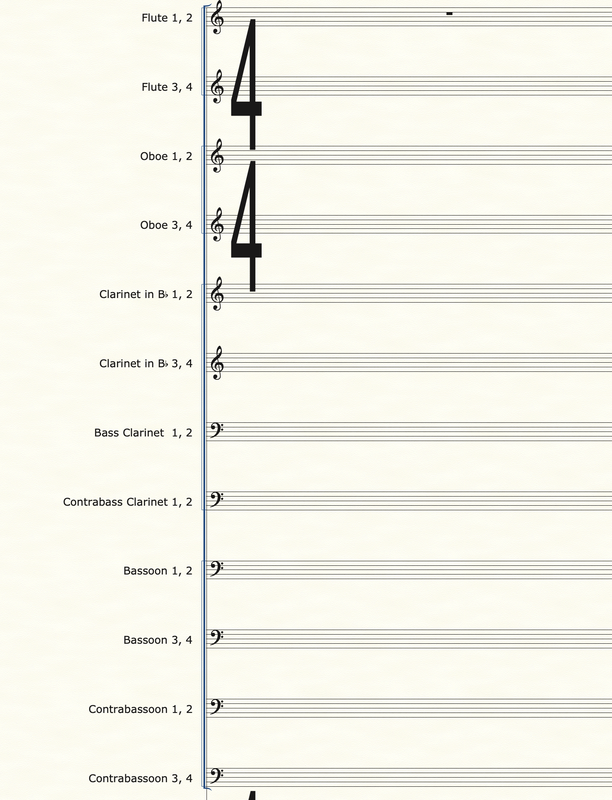 This woodwind section is (admittedly) very large. There are 12 staves just for winds. But how many parts are there? Actually, there are 24 parts to format. The reason for that is players do not want to have to read multiple lines of notation to find their part. It is common and accepted practice for scores to combine multiple instruments onto a single line, but parts (if possible or unless otherwise specified) should not have multiple voices on them. So, how can we design a system where a single staff can be made into multiple parts AND do so without changing the original staff? While this may sound tricky or impossible, there are a few good methods to achieve in either Sibelius or Finale. And there is one method you should ABSOLUTELY NOT use, and I’ll explain that too. My preferred method is to use additional hidden staves. Check out this screen or the same score, but this time with the hidden staves revealed. 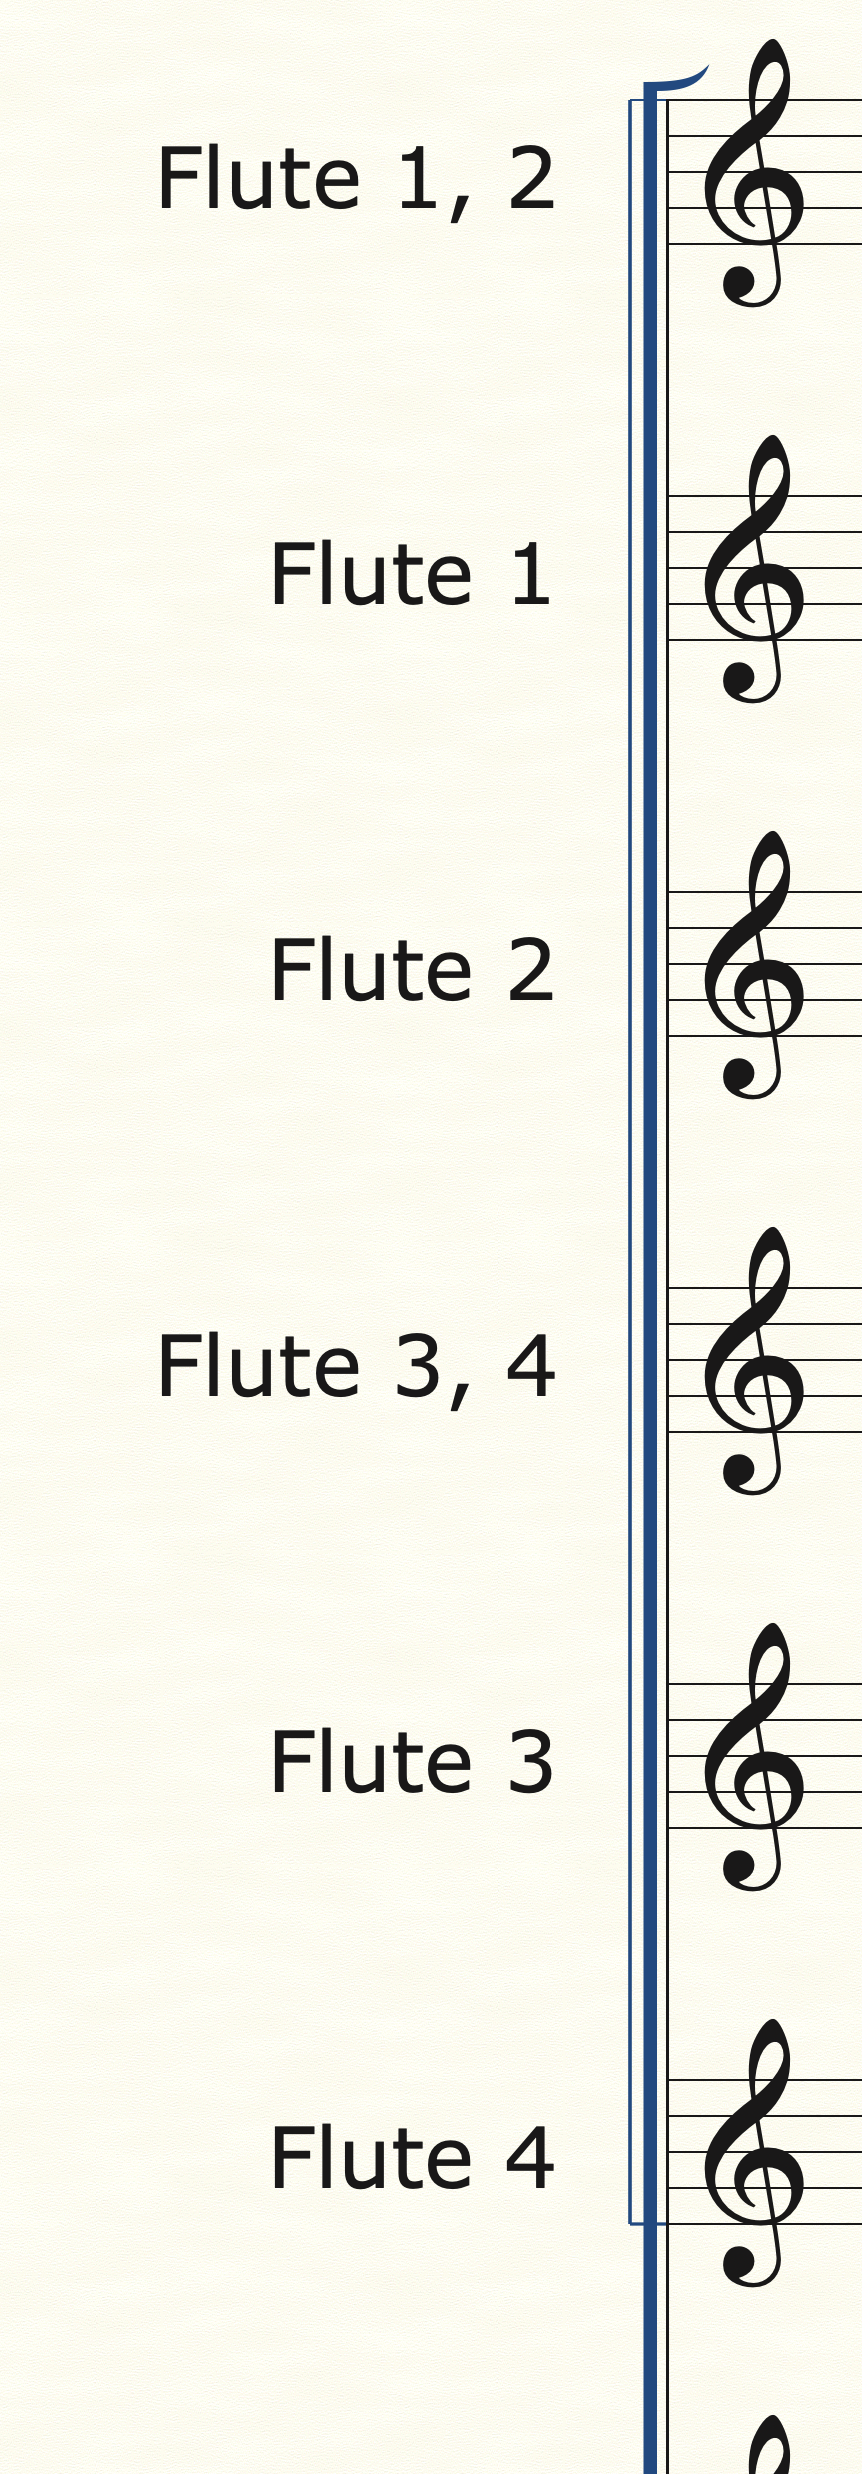 As you can see, right below the Flute 1, 2 staff are two separate Flute 1 and Flute 2 staves. These staves are hidden in the main score and only used for parts. You can hide staves in Finale by using the Staff tool, double clicking the staff you want to hide and selecting “Force Hide staff” and select “In Score view”. Now, you can add additional staves to your template without changing the formatting or orchestration of your score. In Sibelius, you can achieve a similar function by us the “Focus on Staves” feature in the layout tab. That dropdown menu will show you all the different staves in a file and you can choose which ones to have visible on the score.
Once these additional staves are in place, you can copy the original part into both of those and separate out the notes for each part. There are multiple methods for this and which one to use greatly depends on several factors, including the complexity of the music, how you want to handle cues in the different voices, etc. For Sibelius, you can highlight the source staff, go to Note Input/Explode, and then select the staves you want the music to go into. Bam! Done! In Finale, you can use Utilities/Explode, but I prefer to use JW Staff Polyphony to help split the voices or to copy the source music into the new staves, and then use TG Tools/Process Extracted Parts and select the appropriate voice for the staff I’m working on. The benefits from using this hidden staves method will pay dividends repeatedly down the road for you. Now, you have the original source music intact and can refer to it while making any number of changes to the individual parts. Later, once you have formatted your part for the top line notes, in this case Flute 1, often you can use the copy part layout function in both programs as the 2nd voice, Flute 2, will need the same formatting as the 1st voice. That means you only must format one part and then you can reuse that formatting again without having to go through all steps twice, a huge time-saver. One method that you SHOULD NOT USE is to extract the original part into a separate file and then format. This method was the only one available before Sibelius (with dynamic parts) and Finale (with Linked Parts) added this functionality well over ten years ago. Using this method will create dozens of extra steps and redundancies that waste time and are terribly inefficient. There are a few very special circumstances where it may be necessary to extract a part as an entirely separate file, but those are very few and rare. If you are using a part extraction method, I urge you in the strongest terms to not use this method any longer. You are wasting your time, creating additional opportunities for errors to creep into your music and missing out on tons of benefits from having your parts linked to the original score. Just like building a house, a good template is built on a strong foundation and a lot of the most important features are where you can’t see them. The more time and consideration you give to every step in the process from initial note input to final editing will yield benefits that multiply over the time you are working on the specific piece of music and over the months and years you use your template. As always, if you have questions, need advice, want to schedule a time for a custom template consultation or need a template designed for you next project, please contact us here are Engraver’s Mark Music. We have the tools and experience to help with any project, big or small.  In the 2nd installment of my series on template design, it’s time to start talking about more features and functions of a notation template. Now that you’ve established the basic structure, page sizes, staff sizes, etc., of the template, the next step is to dive deeper into the specific settings, defaults, and tools you’ll use when working with the template. Here’s where things can get confusing or overwhelming for a lot of users, but don’t worry, there are lots of easy settings and defaults you can change that will go a long way in making your template and your workflow smoother and the end results better.
In both Finale and Sibelius, there are menus that control the specific engraving settings for the notation. For Finale, go to Document/Document Options; in Sibelius, go to Appearance/Engraving Rules. These menus have dozens of different submenus and sections that control the look, placement, and function of elements like stems, barlines, staff lines, time signatures and a host of other features. Most of these settings are best left alone (unless you are very familiar with the programs or just like to tinker with things to see what happens) as these are set to defaults that allow 99% of music notation to look correct. However, you should get familiar with them all the same, just so you know where these settings can be changed, and what affect that will have on the look and feel of your notation. One default document setting I would change, however, on both programs is the relative thickness of elements like barlines and stem lines as compared to the staff line thickness. Generally, the barlines and stem lines in both programs default to the same thickness, or even slightly thinner, as the staff lines. However, the barlines and stem lines should be slightly thicker than the staff lines. This helps those elements to stand out from the staff to be more visible and easier to read. In Finale, go to the Barlines or Stems submenus in the Documents Options main menu and adjust accordingly. For Sibelius, go to the Barlines or Beams and Stems submenus in the Engraving Rules main menu. Just remember, a little goes a long way here, so adjust carefully; you can really go deep on all the various settings and defaults you can changes in these menus. As much as anything you adjust in these document options, what will make your template an asset to your workflow is making sure you use the correct tool for the job. I can’t stress this enough; no matter how many settings you adjust or what fancy notation you use, your template will only be as good as how it is used. For example, in Sibelius, DO NOT use regular boxed text and assume it is the same as a SYSTEM boxed text. Or assign a tempo change using the technique text instead of the tempo marking text. I have seen both mistakes made so often, even on great looking scores. The problem is that if you use the wrong tool for the notation element you are inputting, then there is no guarantee that it will work correctly, or always show up in the correct place in the score or any of the parts. In this example, if you intended the boxed text to be a section marking or some other text that would show up on each part automatically, it WILL NOT if you used the regular boxed text category as that only appears on the staff it is attached too and will not show up on any other subsequent dynamic parts. Same thing for the tempo markings. While they may look correct on the score, they will not function correctly, and you have just created a massive amount of work for yourself by not simply using the correct text style. Becoming familiar with the text styles and appearance options in Sibelius will help you learn the different uses of the dozens of text styles and how best to use them. Again, the defaults already in the program work great if you use them correctly. In Finale, many of the same issues come up with how people use the expression tool. Here, the different categories of each type of expression control it’s placement within the score and visibility in score and all the linked parts. DO NOT use an expression text or technique text for something like a tempo marking or vice versa. Another place I see mistakes in Finale often occurs when people use the lyric tool to input chord changes, or the measure assigned text function for chord changes or lyrics. Using any of these incorrect input methods is a recipe for major issues in your files. Especially in Finale, which is a tools-based program, using the wrong tool is a critical error. My last piece of advice for template design is to experiment with your template constantly. Once you have some settings adjusted or new defaults created, engrave something. What I do is take a piece of music I have previous engraved and redo it in my new template and compare them; what do I like about one or the other, what elements stand out, which one functioned better based on the result I was trying to achieve? How can you know how something will change the look or function of your template if you don’t try it out? I find it’s best to use the same piece of music to experiment with different template designs since you’ll be familiar with the piece and can then focus more on how your template functions, as well as being able to easily compare the final product. Remember, any settings you change in the document options menus for either of these programs are specifically tied to the file you are working on, no necessarily new program defaults for every file. So, you can always have many different templates, contemporary, or traditional looking notation fonts, or ones with completely different text settings as well. For a much deeper dive into the various tools in Finale, I recommend watching all the tutorial videos from Jason Loffredo’s excellent Conquering Finale series. For Sibelius, there are several great blogs out there, but I recommend going first to the Scoring Notes Product Guide and scroll down to the Sibelius section. Here, along with other notation programs, are dozens of blog posts and different links to all sorts of information and tips. If you ever need some help or advice on your templates, please reach out and contact us and Engraver’s Mark Music will be happy to help. We have templates that are customized for various ensembles and uses that are used every day by our team and are available to you. We’d be honored to help you design a notation template that enhances your creativity and saves your time and effort.  In the first of a two-part series, I wanted to go over some basic ideas, concepts, and issues you want to think about as you create a custom template for your music notation. There are so many topics to consider here that I could not cover them all, however, I do want to go over some the guiding principles as you begin to develop a music notation template.
Whenever you are designing anything, it is best to start with a vision of the end product; how it will be used, what it will look like and how it will function. Smart design means carefully thinking through all your steps with the end in mind. Yes, you will adjust and change your design as you go, but without that clear goal in the beginning, your final product will not fulfill all the purposes you originally intended. In the music engraving world, design, implementing and updating templates is a larger part of any engraver’s day to day work. Every time a new feature is added to a notation software, or a new workflow is developed, it can create new possibilities or challenges that need to be addressed in the templates that we use every day for our clients. By constantly updating the templates we designed, our clients benefit from our increased abilities, capacities, and efficiencies. So, how do you start to design a template in any music notation software? Well, I always start with considering the needs of the end user/customer. Knowing who will be reading and using the music informs all the choices that will be made afterwards as you design the template. Key questions are:
The answers to all these questions will completely change the trajectory of the design of your template since each of these scenarios will necessitate your template having difference features and formats. The next step to is come up with a top-down approach, starting with features like page sizes and staff sizes for the score and parts, instrumentation, font choices and a whole host of other issues. A great place to start for all orchestral music is to study the MOLA Music Preparation Guidelines. This gives a ton of information on industry standard practices and requirements and really does a great job in explaining and giving examples. Choral music has many different requirements, and it is usually best to check with your publisher on what features they will want to see from your music. Once you have all this information, it’s time to start making your score as readable as possible. Before any music is added to your score is the time to make sure the score and part pages have consistent and standardized placements and spaces. Where will the title information and other information be placed? How about the spacing between each staff on the score pages or the distance between the systems for each part? As simple as this sounds, spending time and thought on these basic elements will improve not only the look of your music, but the overall presentation and quality as well. Always aim for consistency and clarity. As always, if you have questions or need some help designing a template for your music, Engraver’s Mark Music is here to help. We have templates ready to go for just about any musical situation or we can create a custom template or modify your existing template. Just contact us and we’ll be happy to help. In the next post in this series, I’ll go over some more specific details and best practices of not only how to set up a good template, but how to use it and what modifications you may want to consider. One of the standard tasks I get asked to do as a music engraver/copyist is to take someone’s finished score and format the parts either for a recording session or live performances. Simple enough, right? Well… sometimes yes and sometimes no. Often, I have found that while the composer or orchestrator has spent a great deal of time thinking about and formatting how their scores will look, they have not really considered the needs of the parts and the formatting thereof. So, this brings up an interesting dilemma for those of us in the music engraving world: Should I, no matter what condition the file is in, good or bad, perfect, or lacking, automatically copy everything into one of my own templates and then proceed OR should I make it work with the file I’ve been given? This is a rather complex question and can have many potential answers depending on the situation. I’ll do a deeper dive on this question in another blog post. For this exercise, I’ll say our client used Finale version 26. Let’s also assume the file you have is in good shape, i.e., all elements of the music seem to be input correctly and all things are in the right categories and places, etc. The next step is to assess the end goal of the parts. Do you know the page size that is required for the given scenario and other considerations? Once all this information is gathered and established, you can now proceed on to formatting parts, right? Oh, not so fast. In Finale or Sibelius, the standard look and feel of the parts is already in the document menu and if it doesn’t match what you need, you’ll have to change it. In Sibelius, just go to Parts/Part Appearance/Configure All Parts. From here you can set page size, staff size and a host of other features that all affect all the parts in one go. Super helpful. For Finale, go to Document/Page Format/Parts. This window gives you the ability to preset all the default options you’ll need for all the parts. Now, let’s assume the default page format in the file you are using is letter size and you want to use either A4 or 9x12. Do you have to go through every linked part and change the page size? No! If you have changed the default page size, then just go to Page Layout tool/Redefine Pages/Selected Pages of Selected Parts/Score. Then select all your parts and click ok. Bam! Everything is now in the correct page size. There are lots of other features in the Parts Format menu in Finale for you to establish the default page margins and staff size as well. Again, depending on your situation, your page margins and staff sizes need to be set to very specific values. Knowing what all those are for any given music project is one of the jobs of a good music copyist. If you are only doing this on one chart, it’s easy to just type in all the values, click ok and move on with life. However, what if this is a major project, with multiple files to adjust. Do you want to be typing all that information in every time? That would be annoying and time consuming. Instead, use a script that will do it all for you. And before you get freaked out that you don’t know how to use FinaleScript or another macro program, never fear! I have provided a zip folder that contains FinaleScripts that will do it all for you. The macros will set up default part format to either A4 or 9x12, a staff size to 7.8mm and page margins at around ½ inch. In the folder you’ll find versions for both Windows and Mac. To copy the scripts into your FinaleScript folder, please reference this webpage for Mac and this webpage for Windows. Click on the “To Share a Script with other Finale users” and this will show you the steps to find the folder on your computer (also go to your preferences window, then folders) where the FinaleScripts are stored. Open that, and then copy appropriate script there. Restart Finale and all should be set to go. * A note on the number values used in these scripts. I typically use EVPUs as my measurement unit of choice. Yes, I know it’s a strange numerical value and can be slightly subjective depending on you monitor set up, however, its’ easier for me to remember whole numbers than a lot of decimal points. Typically, if I am setting up a template to have very specific measures, whether in inches or millimeters, etc., I will change my measurement unit to that, set all my defaults I want in the correct values, and then switch back to EVPUs. The measurements will still be the same, but the numerical value will look different and be a bit easier for me to remember. If you are using another measurement unit, that’s totally fine, however, you’ll need to go into the scripts and adjust the numerical values accordingly. Or, switch your measurement unit to EVPUs before running these scripts and then switch them back to your preferred one after. Contact me for help on this. I offer Finale instruction for $60 per hour if you want to dive deeper on this kind of feature. I have tested these scripts on all my systems and other members of my team have used them as well. They were written in Finale v26, but can be used in other versions, like Finale v25, though you may have to adjust the script. As with anything freeware, use at your own discretion and I cannot guarantee results. * (for more information on this, check out this blog post from Scoring Notes and this post here at Engraver’s Mark Music) Now you have an easy, repeatable way to adjust default part page parameters in any Finale document! As always, if you need advice or assistance with any music engraving, copying or printing project, contact me and let’s start a conversation! 
|
AuthorSammy Sanfilippo, CEO of Engraver's Mark Music Archives
November 2023
Categories
All
|
||
 RSS Feed